SETUP USER DEFINED RATES
A User defined rate is used when a user or customer service wants to manually add additional charges to a consignment. V6 provides this feature so that extra charges can be captured at point of entry.
To setup User Defined Rate go to Menu>Administration>Rates>User Defined Rate Setup.
.png)
-
Doc No is a system generated number and does not need to be populated.
-
Code is an alphanumeric field used to define the rate
-
Customer is for whom the rate is being setup for or blank for all customers.
-
Customer class is used to divide customers into categories (or groups) so one rate policy can be applied or leave blank for all.
-
Job type helps to categories the consignment for rating or leave blank for all job types.
-
Service type is used to rate consignments of a particular service or leave blank for all service types.
-
GL Account, GL Department and tax code are used to direct consignment revenue to the correct accounts.
On this screen (see below), if the Customer Selectable field is ticked, this user-defined rate will be shown to the customer booking screen as an extra service for them to tick.
If the Fuel Levy Applies box is selected, then the rating process will take the fuel levy into account.
If the chargeable box is selected, this rate is a service which requires a payment when using this. The payment details related to this service is added to a consignment when it is reviewed by customer service users, often by adding a user defined rate to it.
.png)
SETUP DISTANCE & TIME RATES
This type of rate is based on distance and time of travelling to calculate the payment on a consignment.
Go to Menu>Administration>Rates>Distance and Time Rates
.png)
-
Doc No is a system generated number and does not need to be populated.
-
Customer is who the rate is being setup for or blank for all customers.
-
From date and Expiry date are used to help with users with the uprate process.
-
Job type helps to categories the consignment for rating or leave blank for all job types.
-
Service type is used to rate consignments of a particular service or left blank for all service types.
-
GL Account, GL Department and tax code are used to direct consignment revenue to the correct accounts.
-
Doc No is a system generated number and does not need to be populated.
-
Customer is who the rate is being setup for or blank for all customers.
-
From date and Expiry date are used to help with users with the uprate process.
-
Job type helps to categories the consignment for rating or leave blank for all job types.
-
Service type is used to rate consignments of a particular service or left blank for all service types.
-
GL Account, GL Department and tax code are used to direct consignment revenue to the correct accounts.
.png)
SETUP FUEL LEVY RATES
Fuel Levy rate are used to recoup some of the operating cost associated to fuel.
To setup fuel levy rates, go to Menu>Administration>Rates>Fuel Levy Rates
.png)
Add or edit fuel levy rates
-
Code is an alphanumeric field used to define the Fuel levy.
-
Description name for the Fuel Levy
-
GL code and Department code are used to direct revenue to the correct accounts.
-
Start and End date time the Fuel levy runs for.
-
Rate % is the percentage of revenue that is charged as fuel levy.
-
Add blank line creates a new line below the current fuel levy for future levy’s.
.png)
SETUP RISK LEVY RATE
Risk levy can be applied onto a consignment booked within specified dates.
To setup go to Menu>Administration>Rates>Risk Levy Rate to setup. (Risk Levy can be applied at a global level, customer level or a ratecard level.)
.png)
Add or edit risk levy
-
Code is an alphanumeric field used to define the customer class.
-
Description is used to describe the class.
-
GL Account and GL Department are used to direct consignment expenditure to the correct accounts.
-
Start date and End date are used to apply the rate to consignment within this range.
-
Charge $ is the amount of the levy
.png)
Subhub
Location
Unserved
Location
Depots
Delivery Estimate
Subhub
Location
Unserved
Location
Depots
Delivery Estimate
SETUP AGENT RATES
An Agent rate is applied when calculating the charges that are payable to an agent. Like customer quoted rates, the user can define an Agent rate using various parameters and the quantity breakdowns.
Go to Menu>Rates>Agent Rates to setup agent rates.

Add or Edit Agent rates
-
Doc No is a system-generated number and does not need to be populated.
-
The agent is who the rate card is being set up for.
-
From date and Expiry date are used to help with users with the uprate process.
-
From Location and To Location is used to look at consignments collect and delivery location. Locations are treed as Zone>Area>Town>PostCode>Suburb.
-
Job type helps to categories the consignment for rating.
-
Service type is used to rate consignments of a particular service.
-
Vehicle type is used so rates can be defined by vehicle grouping.
-
Freight class is used to rate grouped product items.
-
Rate basis used to calculate based on Weight, Items, Pallets and Volume
-
Rate break type is used to define an unlimited number of volume break points, which can be stepped or normal.
-
GL Account, GL Department and tax code are used to direct consignment expenditure to the correct accounts.
.png)
Click Type For More Menu
Freight Classes
SETUP FREIGHT CLASS
Freight class is used to group shipping items, and used in the rating process to find a rate.
To setup go to: Menu>Administration>Types>Freight Class
.png)
Add or edit freight class
-
Freight Class is an alphanumeric field used to define the class.
-
Description is name given to the freight class.
-
Type is an unused field reserved for future development.
.png)
Job Type
SETUP JOB TYPES
Job type helps to categorise the consignment for rating and reporting. To setup j
Job Type, go to Menu>Administration>Types>Job Types
.png)
Add or edit job type
-
Job Type is an alphanumeric field used to define the type of job.
-
Description is name given to the product class and is displayed on the booking screen.
Service Type
.png)
SETUP SERVICE TYPES
Under a job type, users can setup multiple service types. Combined with other parameters, job type, service type is used to select a rate during the rating process. To setup go to: Menu>Administrations>Types>Service Type
.png)
Add or edit service types
-
Service Type is an alphanumeric field used to define the service type.
-
Description is name given to the service.
-
Cubic conversion is a mandatory field that can be set to 0.0 if this field is to be ignored. However if this field is required it is used in cubic conversion for jobs using this service type. (300.0 = 3:1 200.0 = 2:1 etc.)
-
Job type is used to restrict the service to only that job type.
-
Same day Delivery and Days Available On (if used) are to help define delivery window and servicing.
-
Pickup Window and Delivery Window define the time (hours) range for pickup/delivery.
-
Service Flag field can be used by some organisations to classify service types, and to apply some specific rules to them.
Products
.png)
SETUP PRODUCT TYPES
Product Types are used in Transport to show what is being consigned and to automatically provide dimensions which helps users when entering a job. To setup go to Menu>Administration>Types>Product.
Products can be imported via a preformatted CSV file or inputted at the screen.
.png)
Add or edit product (see overleaf)
Units
-
Customer field is used if specific products need to be setup that only relate to that customer (otherwise are left blank to make the product global).
-
Product code is an alphanumeric field used to define a product.
-
Freight class is used to group product items.
-
Product class is used to classify product types. (See Setup Product class found later in this manual)
-
Description is the full name of the product.
-
Length, Width, Height and Weight are used to calculate totals on the consignment.
-
Barcode and Serialised are tracking mechanisms used in the warehouse module.
-
Division is used to determine if a product can be used in transport or in warehousing or both.
-
After the product is saved, at the bottom of the screen, there is an area to setup default bin location of the product for each warehouse. This default bin is used in pick up as well as shipping order.
-
When an inbound order is created. If users select this product, the "bin" with default flag will be filled so that the product will be automatically received at that bin location. This applies both for inbound order or inbound request.
-
When an outbound request is initialized, the default bin location will be ordered to the top position of the list, allowing users to select the stock from that bin location as prefereed if product is serialised. if the product is not serialised, the quantity for shipping out will be picked from the default bin first, then from other bin until the shipping quantity is fully picked.
-
When a transfer request is initalised, the default bin is used on the outbound order as preferred.
-
For details of the order, inbound request, outbound request, please refer to the warehouse order section of this manual
-
.png)
SETUP UNITS
Units Means a recreational; vehicle or towable owned by a person other than the company that is in any's possession for sale on a consignment basis.
To set up user limits go to Menu>Administrators>Types>Units

Add or edit Units
-
The code is the field where the user can enter the relatable code for the defined unit
-
The singular description is the field where the user can define a single value for the unit
-
The plural description is the field where the user can define Plural value for the unit
For add edit units, click on Add new record>

Addresses
SETUP ADDRESSES
This menu is to define all addresses in the system and then they can be used anywhere an address is required, for example; Consignment Booking and Warehouse orders. The address can be linked to a customer and user-defined rates so that if a consignment is booked from or to that address, it will apply that user-defined rate automatically.
Go to: Menu>Administration>Types>Addresses
.png)
Addresses can be imported via a preformatted CSV file or inputted at the screen.
Add and edit Addresses
-
Customer is used to associate the address with the customer.
-
Business name is a description for the physical location.
-
Address is the physical address in of the business.
-
Suburb is validated against the Australian postcode table.
-
State will populate automatically on suburb validation.
-
Postcode will populate automatically on suburb validation.
-
Country is a free text field and is not required
-
Contact Person is where a contact for that address can be added.
-
Telephone is where a phone number for that address can be added.
-
Fax is where a fax number for that address can be added.
-
Email is where an email address for that address can be added. (Can be used in email rules e.g. Delivery notifications)
-
Account Number is an extra reference if required
-
Special instructions are used if the address has some type of requirement that needs to appear on the consignment.
-
User defined rate is where the address can be linked to a rate.
.png)
Products Class
SETUP PRODUCT CLASS
Product class is used to classify product types. Product class is mainly utilised in warehouse and storage.
To setup Product Class go to Menu>Administration>Types>Product Class.
.png)
Add or edit product class
-
Product Class is an alphanumeric field used to define the Products.
-
Description is name given to the product class.
-
Type is an unused field reserved for future development.
Container Size
.png)
SETUP CONTAINER SIZE
The container is a large metal box of a standard design and size used for the transports of goods by road, rail, sea, or air.Standard ISO shipping containers are 8ft(2.43m) wide,8.5ft(2.59m) high and come in two lengths;20ft(6.06m) and 40ft(12.2m) .Extra tall shipping containers called high-cube containers are available at 9.5ft(2.89m) high.
To set up user limits go to Menu>Administrators>Types>Container Size

Add or edit Container Size
-
Size code is an alphanumerical field where you can define code for the container size.
-
The description is the field where you can define the detail of container size
-
Internal length is a decimal field that you can define the inner length of the container.
-
External length is a decimal field that you can define the outer length of the container.
-
Internal width is a decimal field that you can define the inner width of the container.
-
External width is a decimal field that you can define the outer width of the container.
-
Internal height is a decimal field that you can define the inner height of the container.
-
External height is a decimal field that you can define the outer height of the container.
-
Tara weight is a unladen weight of the container.
-
Max gross weight is the maximum operating weight of container.
-
Cubic capacity refers to the volume of a cylinder between internal volume and external volume.
-
Door opening width is the width of door leaf of vehicle.
-
Door opening height is the height of door leaf of vehicle.
For add edit units, click on Add New Container Size>
Container Type

SETUP CONTAINER TYPE
These shipping containers are the structures that store various kinds of products that need to be shipped from one part of the world to another using different type of container ships.Various kind of shipping containers are being used today
To set up user limits go to Menu>Administrators>Types>Container Type

Add or edit Container Type
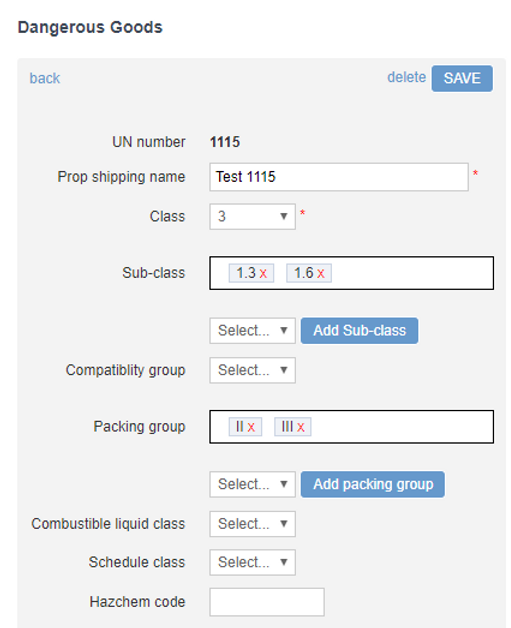
Dangerous Good
-
Container Type is a alfanumerical field where user can enter name of container type
-
Description is the field which define the detail of container type.
For add edit units, click on Add New Container Type>

SETUP DANGEROUS GOODS (DG)
To maintain DangerousGoods (UN number, Class....)
Go to Menu>Administration>Types>Dangerous Goods>Add New Dangerous Goods
Input Dangerous Goods information as required in the boxes and save.
To add a class, select the dropbox and click "Add Class" to include the subclass into the box. One UN can have multiple Sub-classes. The same is true for the packing group.
The information setup in this dialog is used to verify when setting up the Product with DG. To associate a product with DG information, go to "Menu>Administration>Types>Products". On the section "Dangerous Goods", select the UN number, and input packing group. On the bottom of the Product Setup screen, users can also upload a safety data sheet (SDS) for the product. (see below images)