SETUP USER DEFINED RATES
A User defined rate is used when a user or customer service wants to manually add additional charges to a consignment. V6 provides this feature so that extra charges can be captured at point of entry.
To setup User Defined Rate go to Menu>Administration>Rates>User Defined Rate Setup.
.png)
-
Doc No is a system generated number and does not need to be populated.
-
Code is an alphanumeric field used to define the rate
-
Customer is for whom the rate is being setup for or blank for all customers.
-
Customer class is used to divide customers into categories (or groups) so one rate policy can be applied or leave blank for all.
-
Job type helps to categories the consignment for rating or leave blank for all job types.
-
Service type is used to rate consignments of a particular service or leave blank for all service types.
-
GL Account, GL Department and tax code are used to direct consignment revenue to the correct accounts.
On this screen (see below), if the Customer Selectable field is ticked, this user-defined rate will be shown to the customer booking screen as an extra service for them to tick.
If the Fuel Levy Applies box is selected, then the rating process will take the fuel levy into account.
If the chargeable box is selected, this rate is a service which requires a payment when using this. The payment details related to this service is added to a consignment when it is reviewed by customer service users, often by adding a user defined rate to it.
.png)
SETUP DISTANCE & TIME RATES
This type of rate is based on distance and time of travelling to calculate the payment on a consignment.
Go to Menu>Administration>Rates>Distance and Time Rates
.png)
-
Doc No is a system generated number and does not need to be populated.
-
Customer is who the rate is being setup for or blank for all customers.
-
From date and Expiry date are used to help with users with the uprate process.
-
Job type helps to categories the consignment for rating or leave blank for all job types.
-
Service type is used to rate consignments of a particular service or left blank for all service types.
-
GL Account, GL Department and tax code are used to direct consignment revenue to the correct accounts.
-
Doc No is a system generated number and does not need to be populated.
-
Customer is who the rate is being setup for or blank for all customers.
-
From date and Expiry date are used to help with users with the uprate process.
-
Job type helps to categories the consignment for rating or leave blank for all job types.
-
Service type is used to rate consignments of a particular service or left blank for all service types.
-
GL Account, GL Department and tax code are used to direct consignment revenue to the correct accounts.
.png)
SETUP FUEL LEVY RATES
Fuel Levy rate are used to recoup some of the operating cost associated to fuel.
To setup fuel levy rates, go to Menu>Administration>Rates>Fuel Levy Rates
.png)
Add or edit fuel levy rates
-
Code is an alphanumeric field used to define the Fuel levy.
-
Description name for the Fuel Levy
-
GL code and Department code are used to direct revenue to the correct accounts.
-
Start and End date time the Fuel levy runs for.
-
Rate % is the percentage of revenue that is charged as fuel levy.
-
Add blank line creates a new line below the current fuel levy for future levy’s.
.png)
SETUP RISK LEVY RATE
Risk levy can be applied onto a consignment booked within specified dates.
To setup go to Menu>Administration>Rates>Risk Levy Rate to setup. (Risk Levy can be applied at a global level, customer level or a ratecard level.)
.png)
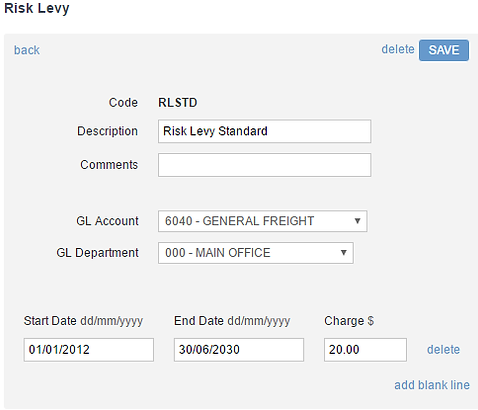
Add or edit risk levy
-
Code is an alphanumeric field used to define the customer class.
-
Description is used to describe the class.
-
GL Account and GL Department are used to direct consignment expenditure to the correct accounts.
-
Start date and End date are used to apply the rate to consignment within this range.
-
Charge $ is the amount of the levy
.png)
Subhub
Location
Unserved
Location
Depots
Delivery Estimate
Subhub
Location
Unserved
Location
Depots
Delivery Estimate
SETUP AGENT RATES
An Agent rate is applied when calculating the charges that are payable to an agent. Like customer quoted rates, the user can define an Agent rate using various parameters and the quantity breakdowns.
Go to Menu>Rates>Agent Rates to setup agent rates.

Add or Edit Agent rates
-
Doc No is a system-generated number and does not need to be populated.
-
The agent is who the rate card is being set up for.
-
From date and Expiry date are used to help with users with the uprate process.
-
From Location and To Location is used to look at consignments collect and delivery location. Locations are treed as Zone>Area>Town>PostCode>Suburb.
-
Job type helps to categories the consignment for rating.
-
Service type is used to rate consignments of a particular service.
-
Vehicle type is used so rates can be defined by vehicle grouping.
-
Freight class is used to rate grouped product items.
-
Rate basis used to calculate based on Weight, Items, Pallets and Volume
-
Rate break type is used to define an unlimited number of volume break points, which can be stepped or normal.
-
GL Account, GL Department and tax code are used to direct consignment expenditure to the correct accounts.
.png)
TRANSPORT ADMINISTRATION
Before using the V6 Transport and Warehousing modules, information linked to how Transport and Warehouses are run must be entered into tables. The information inside these tables include Customers, Job types, Service types, Products, Addresses, Rates, Depots, Drivers and Vehicles. These tables are relevant across multiple modules, such as Transport and Warehouse.
SETUP SERVICE TYPES
Under a job type, users can setup multiple service types. Combined with other parameters, job type, service type is used to select a rate during the rating process. To setup go to: Menu>Administrations>Types>Service Type
.png)
Add or edit service types
-
Service Type is an alphanumeric field used to define the service type.
-
Description is name given to the service.
-
Cubic conversion is a mandatory field that can be set to 0.0 if this field is to be ignored. However if this field is required it is used in cubic conversion for jobs using this service type. (300.0 = 3:1 200.0 = 2:1 etc.)
-
Job type is used to restrict the service to only that job type.
-
Same day Delivery and Days Available On (if used) are to help define delivery window and servicing.
-
Pickup Window and Delivery Window define the time (hours) range for pickup/delivery.
-
Service Flag field can be used by some organisations to classify service types, and to apply some specific rules to them.
.png)
SETUP PRODUCT TYPES
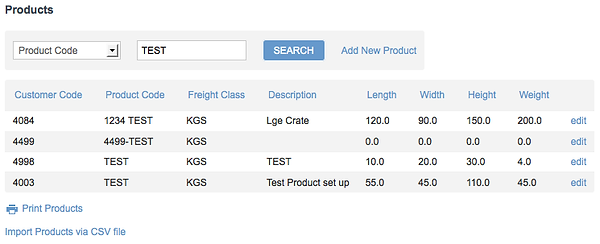
Product Types are used in Transport to show what is being consigned and to automatically provide dimensions which helps users when entering a job. To setup go to Menu>Administration>Types>Product.
Products can be imported via a preformatted CSV file or inputted at the screen.
.png)
Add or edit product (see overleaf)
-
Customer field is used if specific products need to be setup that only relate to that customer (otherwise are left blank to make the product global).
-
Product code is an alphanumeric field used to define a product.
-
Freight class is used to group product items.
-
Product class is used to classify product types. (See Setup Product class found later in this manual)
-
Description is the full name of the product.
-
Length, Width, Height and Weight are used to calculate totals on the consignment.
-
Barcode and Serialised are tracking mechanisms used in the warehouse module.
-
Division is used to determine if a product can be used in transport or in warehousing or both.
-
After the product is saved, at the bottom of the screen, there is an area to setup default bin location of the product for each warehouse. This default bin is used in pick up as well as shipping order.
-
When an inbound order is created. If users select this product, the "bin" with default flag will be filled so that the product will be automatically received at that bin location. This applies both for inbound order or inbound request.
-
When an outbound request is initialized, the default bin location will be ordered to the top position of the list, allowing users to select the stock from that bin location as prefereed if product is serialised. if the product is not serialised, the quantity for shipping out will be picked from the default bin first, then from other bin until the shipping quantity is fully picked.
-
When a transfer request is initalised, the default bin is used on the outbound order as preferred.
-
For details of the order, inbound request, outbound request, please refer to the warehouse order section of this manual
-
.png)

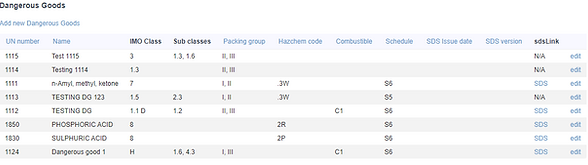
SETUP DANGEROUS GOODS (DG)
To maintain DangerousGoods (UN number, Class....)
Go to Menu>Administration>Types>Dangerous Goods>Add New Dangerous Goods
Input Dangerous Goods information as required in the boxes and save.
To add a class, select the drop box and click "Add Class" to include the sub class into the box. One UN can have multiple Sub-classes. The same is true for packing group.
The information setup in this dialog are used to verify when setting up the Product with DG. To associate a product with DG information, go to "Menu>Administration>Types>Products". On the section "Dangerous Goods", select the UN number, and input packing group. On the bottom of Product Setup screen, users can also upload a safety data sheet (SDS) for the product. (see below images)


TRANSPORT ADMINISTRATION
SETUP ADDRESSES
This menu is to define all addresses in the system and then they can be used anywhere an address is required, for example; Consignment Booking and Warehouse orders. The address can be linked to a customer and user-defined rates so that if a consignment is booked from or to that address, it will apply that user-defined rate automatically.
Go to: Menu>Administration>Types>Addresses
.png)
Addresses can be imported via a preformatted CSV file or inputted at the screen.
Add or edit addresses
-
Customer is used to associate the address with the customer.
-
Business name is a description for the physical location.
-
Address is the physical address in of the business.
-
Suburb is validated against the Australian postcode table.
-
State will populate automatically on suburb validation.
-
Postcode will populate automatically on suburb validation.
-
Country is a free text field and is not required
-
Contact Person is where a contact for that address can be added.
-
Telephone is where a phone number for that address can be added.
-
Fax is where a fax number for that address can be added.
-
Email is where an email address for that address can be added. (Can be used in email rules e.g. Delivery notifications)
-
Account Number is an extra reference if required
-
Special instructions are used if the address has some type of requirement that needs to appear on the consignment.
-
User defined rate is where the address can be linked to a rate.
.png)
SETUP PRODUCT CLASS
Product class is used to classify product types. Product class is mainly utilised in warehouse and storage.
To setup Product Class go to Menu>Administration>Types>Product Class.
.png)
Add or edit product class
-
Product Class is an alphanumeric field used to define the Products.
-
Description is name given to the product class.
-
Type is an unused field reserved for future development.
.png)
RATES
Rating is a complex process in which the consignment charge is calculated based on different rules. There are various types of rating supported by V6, with the option to apply auto or manual rates.
SETUP CUSTOMER RATES
Customer rates are rates that are specific to a customer and these rates will be applied automatically to a consignment when booked, if they meet all the criteria including effective & expiry dates. Rates can be calculated based on Weight, Volume, Pallet, Item. Users can also define an unlimited number of volume break points, which can be stepped or normal. In addition, rates can be assigned to a specific location, job, or service. If a field is left blank, it is assumed that all possible values for that criteria apply.
To setup customer quoted rates, go to Menu>Administration>Rates>Customer Rate Setup>Add a New Rate
.png)
Users can input rates one by one or import the rates via a preformatted CSV file.
Add or edit customer rates
-
Doc No is a system generated number and does not need to be populated.
-
Customer is who the rate card is being setup for.
-
Customer class is used to divide customers into categories (or groups) so one rate policy can be applied.
-
From date and Expiry date are used to help with users with the uprate process.
-
From Location and To Location is used to look at a consignments collect and deliver location. Locations are treed as Zone>Area>Town>PostCode>Suburb.
-
Job type helps to categories the consignment for rating.
-
Service type is used to rate consignments of a particular service.
-
Vehicle type is used so rates can be defined by vehicle grouping.
-
Freight class is used to rate grouped product items.
-
Rate basis used to calculate based on Weight, Items, Pallets and Volume
-
Rate break type is used to define an unlimited number of volume break points, which can be stepped or normal.
-
Cubic conversion is a field that can be set to 0.0 which will ignore the field, this field is used to convert cubic to weight so V6 can work out which value is the greater to rate on. (300.0 = 3:1, 200.0 = 2:1 etc.)
-
GL Account, GL Department and tax code are used to direct consignment revenue to the correct accounts.
.png)
.png)
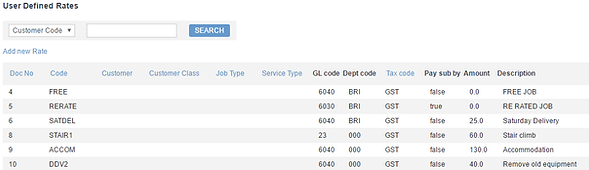
SETUP USER DEFINED RATES
A User defined rate is used when a user or customer service wants to manually add additional charges to a consignment. V6 provides this feature so that extra charges can be captured at point of entry.
To setup User Defined Rate go to Menu>Administration>Rates>User Defined Rate Setup.
.png)
Add or edit defined rates
-
Doc No is a system generated number and does not need to be populated.
-
Code is an alphanumeric field used to define the rate
-
Customer is for whom the rate is being setup for or blank for all customers.
-
Customer class is used to divide customers into categories (or groups) so one rate policy can be applied or leave blank for all.
-
Job type helps to categories the consignment for rating or leave blank for all job types.
-
Service type is used to rate consignments of a particular service or leave blank for all service types.
-
GL Account, GL Department and tax code are used to direct consignment revenue to the correct accounts.
On this screen (see below), if the Customer Selectable field is ticked, this user-defined rate will be shown to the customer booking screen as an extra service for them to tick.
If the Fuel Levy Applies box is selected, then the rating process will take the fuel levy into account.
If the chargeable box is selected, this rate is a service which requires a payment when using this. The payment details related to this service is added to a consignment when it is reviewed by customer service users, often by adding a user defined rate to it.
.png)
SETUP DISTANCE & TIME RATES
This type of rate is based on distance and time of travelling to calculate the payment on a consignment.
Go to Menu>Administration>Rates>Distance and Time Rates
-
Doc No is a system generated number and does not need to be populated.
-
Customer is who the rate is being setup for or blank for all customers.
-
From date and Expiry date are used to help with users with the uprate process.
-
Job type helps to categories the consignment for rating or leave blank for all job types.
-
Service type is used to rate consignments of a particular service or left blank for all service types.
-
GL Account, GL Department and tax code are used to direct consignment revenue to the correct accounts.
-
Doc No is a system generated number and does not need to be populated.
-
Customer is who the rate is being setup for or blank for all customers.
-
From date and Expiry date are used to help with users with the uprate process.
-
Job type helps to categories the consignment for rating or leave blank for all job types.
-
Service type is used to rate consignments of a particular service or left blank for all service types.
-
GL Account, GL Department and tax code are used to direct consignment revenue to the correct accounts.
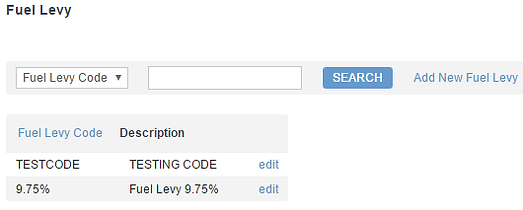
SETUP FUEL LEVY RATES
Fuel Levy rate are used to recoup some of the operating cost associated to fuel.
To setup fuel levy rates, go to Menu>Administration>Rates>Fuel Levy Rates
.png)
Add or edit fuel levy rates
-
Code is an alphanumeric field used to define the Fuel levy.
-
Description name for the Fuel Levy
-
GL code and Department code are used to direct revenue to the correct accounts.
-
Start and End date time the Fuel levy runs for.
-
Rate % is the percentage of revenue that is charged as fuel levy.
-
Add blank line creates a new line below the current fuel levy for future levy’s.
.png)
SETUP RISK LEVY RATE
Risk levy can be applied onto a consignment booked within specified dates.
To setup go to Menu>Administration>Rates>Risk Levy Rate to setup. (Risk Levy can be applied at a global level, customer level or a ratecard level.)
.png)
Add or edit risk levy
-
Code is an alphanumeric field used to define the customer class.
-
Description is used to describe the class.
-
GL Account and GL Department are used to direct consignment expenditure to the correct accounts.
-
Start date and End date are used to apply the rate to consignment within this range.
-
Charge $ is the amount of the levy
.png)
SETUP AGENT RATES
An Agent rate is applied when calculating the charges that are payable to an agent. Like customer quoted rates, the user can define an Agent rate using various parameters and the quantity breakdowns.
Go to Menu>Rates>Agent Rates to setup agent rates.

Add or Edit Agent rates
-
Doc No is a system-generated number and does not need to be populated.
-
The agent is who the rate card is being set up for.
-
From date and Expiry date are used to help with users with the uprate process.
-
From Location and To Location is used to look at consignments collect and delivery location. Locations are treed as Zone>Area>Town>PostCode>Suburb.
-
Job type helps to categories the consignment for rating.
-
Service type is used to rate consignments of a particular service.
-
Vehicle type is used so rates can be defined by vehicle grouping.
-
Freight class is used to rate grouped product items.
-
Rate basis used to calculate based on Weight, Items, Pallets and Volume
-
Rate break type is used to define an unlimited number of volume break points, which can be stepped or normal.
-
GL Account, GL Department and tax code are used to direct consignment expenditure to the correct accounts.

SETUP Agent HOURLY RATES
This type of rate is used to calculate payments to an agent driver based on hours or kilometres which are added manually to a manifest. To setup go to Menu>Rates>Agent hourly rate.

Add or edit a new rate
-
Doc No is a system-generated number and does not need to be populated.
-
The agent is who the rate is being set up for or blank for all agents.
-
From date and Expiry date are used to help with users with the uprate process.
-
Vehicle type is used so rates can be defined by vehicle grouping.
-
GL Account, GL Department and tax code are used to direct consignment expenditure to the correct accounts.

SETUP MANIFEST FULL LOAD RATES
This type of rate is used to calculate manifest payments to agents based on a full load rate from and to a location.
To setup go to Menu>Rates>Manifest full load rates.
.png)
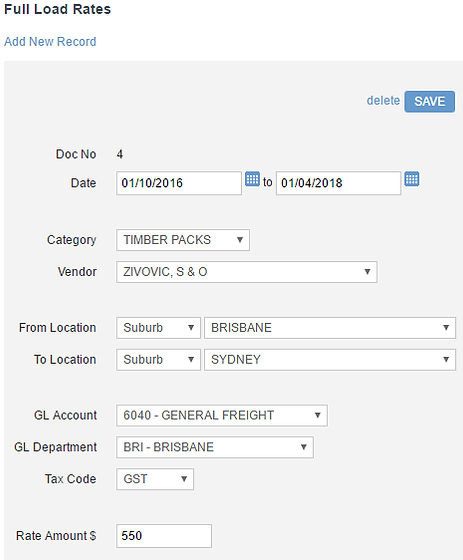
Add or edit new manifest full load
-
Doc No is a system generated number and does not need to be populated.
-
Date is used to help users with the uprate process or control how long the rate is available to use.
-
Category is used to define which load rate to use and is applied at creation of a manifest. (See Category setup)
-
Vendor is who the rate is being applied to. (See Vendor setup)
-
From and to location sets where the rate will be applied of left blank for all locations.
-
GL Account, GL Department and tax code are used to direct revenue and expenditure to the correct accounts.
-
Rate Amount $ is the full load charge and will apply to the manifest used.
.png)
USERS
Users are setup to control access to different areas of V6 by associating them with a group which has access permissions setup based on your company’s processes.
SETUP USERS
Each system user needs to be setup in V6 to be able to access the system.
To setup go to Menu>Administration>Users>Users>Add a New User (see below).
.png)
Add or edit users
-
User Id is a code that is an alphanumeric field used to differentiate users.
-
The user name is the full name of the user.
-
The password is set by the System administrator and can be changed by the user when logged in to V6.
-
Depot is so a user can be linked to one depot or left blank to access all deports.
-
Email address is used for customer service issues, user reset passwords and some reports. The email field is not mandatory but is highly recommended.
-
Account locked is so a user’s account can be set to inactive.
-
The role is set based on the type of user. (All V6 mobile users need to be set up here)
-
Accounts are based on Customer and Agent roles only.
-
Groups are set up based on user permissions, many users can be associated with one group.
-
Warehouses is based on the warehouse user can access.
.png)
SETUP GROUPS
Groups are set so one or many users can be associated to the same access permissions.
To setup go to Menu>Administration>Users>Groups>Add a New Group.
.png)
Add or Edit groups
-
Group is a code that is an alphanumeric field used to differentiate groups.
-
Description is the full name of the group.
-
User is where the users are added to the group.
.png)
SETUP ACCESS PERMISSIONS
Access permissions are set so a group can be associated to the same access permissions.
To setup go to Menu>Administration>Users> Access Permissions>Add a New (see below).
.png)
Add or edit access permissions
-
Id is a system generated field.
-
User or Group relates to user and groups setup earlier in this manual.
-
Resource is a field, menu item, view or action within V6.
-
Access is drop-down that gives the group or use permission to use that field.
-
Glossary gives a description of the resources.
Access Permissions can be set up by your V6 administrator or Omnix support can do it for you as the permissions can get very complicated.
.png)
.png)
LOCATIONS
Locations are an important part of V6 and help with the rating and routing processes, location are treed as follows Zone>Area>Town>Postcode>Suburb.
SETUP LOCALITIES (SUBURBS)
To setup localities go to Menu>Administration>Locations> Localities (Suburbs).
.png)
Add or edit a locality (suburbs)
-
Locality Id is a system generated field.
-
Suburb is the name of a suburb.
-
Postcode is an Australian postcode.
-
State is a dropdown list of states where the suburb is located.
-
Location is a list of codes that are treed as – Zone>Area>Town>Postcode>Suburb.
Setting up new Suburbs are generally an exception to the rule as suburbs are setup by default in a new database install.
.png)
SETUP LOCATION
Locations are treed as – Zone>Area>Town>Postcode>Suburb. Select a location type at the drop-down at the top of the screen, and then input a location name to search. To setup locations go to Menu>Administration>Locations>Locations.
.png)
Add or edit location (town/post code/area/zone)
-
Code is an abbreviation of the Town/Post Code/Area/Zone.
-
Name is the name of the Town/Post Code/Area/Zone.
-
Parent Town/Post Code/Area for the tree setup.
-
Rate Bypass Town this town is used to overwrite the parent town within a location tree in looking up a rate. This is used for towns that are an exception to the standard rules.
.png)
.png)
SETUP UNSERVICED LOCATIONS
Unserviced locations are used to filter out locations that are not services so when users or customers are booking consignments they are notified that the location is not serviced.
To setup go to Menu>Administration>Location>Un-serviced Locations.
.png)
.png)
Add or edit unserviced locations
-
Location type is a Zone, Area, Town, Postcode or Suburb.
-
Name is the Zone, Area, Town, Postcode or Suburb.
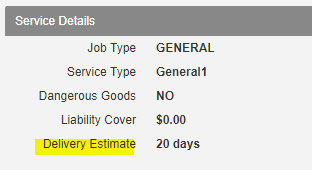
SETUP DELIVERY ESTIMATE
Delivery Estimate provides the estimated time of delivery between locations (subject to tree-lookup in a similar fashion to rate lookup
by location). To setup go to Menu>Administration>Location>Delivery
Estimate


Add or edit delivery estimate time
-
Delivery Estimate can be setup by location, job type, service type
-
The value setup (days) is displayed on the "View Booking" screen and "Tracking" screen. The lookup rule is similar to which of rate location lookup

SETUP DEPOTS
Depots are used to manage jobs, resources, costs and revenue.
To setup go to Menu>Administration>Location>Depots.

Add or edit depots
-
Depot Code is an abbreviation of the depot
-
Description is the full name of the depot
-
GL Department is to allocate revenue and expenditure to the correct depot
VEHICLES
Vehicles in V6 are used to control how a consignment is moved and how the revenue for that consignment should be apportioned.
SETUP VEHICLES
Vehicles are setup as the physical equipment doing a job.
To setup locations go to Menu>Administration>Vehicles>Vehicles.
.png)
.png)
Vehicles can be imported via a preformatted CSV file or inputted at the screen.
.png)
Add or edit vehicle types
-
Vehicle Type Code is an abbreviation for the vehicle type.
-
Description is a full description of the vehicle type.
SETUP VEHICLE TYPES
Vehicles Types are setup to group equipment to help operations select the correct vehicle for a job.
To setup locations go to Menu>Administration>Vehicles>Vehicle Types.
.png)
Add or edit vehicles
-
Vehicle Code is an abbreviation or fleet number of the vehicle
-
Vehicle type is a way to group the equipment to help operations select the correct vehicle for a job. (See Setup Vehicle Types)
-
Registration number is the rego of the vehicle.
-
Depot is used to control were the vehicle is based
-
Time Zone is used for V6 mobile so jobs are time stamped correctly
-
Agent mobile user is there to setup the mobile user against the vehicle
-
All other fields are free text fields and are not mandatory. (Capacity fields will be used in future development).
.png)
SETUP DELAY REASONS
Delay reasons can be used when a consignment is delayed in transit via the V6 mobile app or through Consignment delay in Customer service. To setup Delay reasons go to Menu>Administration>Vehicles>Delay Reason
.png)
Add or edit delay reasons
-
Delay Reason Code is an abbreviation for the delay type.
-
Description is a full description of the delay.
-
Hide from customer is so the customer is unable to view that delay reason.
-
Hide from driver and Message despatch are both not in user and are there for future development.
.png)
SETUP DRIVERS
Drivers are setup so operations have visibility over who the work has been allocated to and system keeps the record of past jobs administrative purposes.
To setup Drivers go to Menu>Administration>Vehicles>Drivers
.png)
Add or edit drivers
-
Driver Code is an abbreviation for the Driver.
-
Driver Name is the full name of the driver.
-
Depot is where the driver is based.
-
All other fields are general information related to the driver.
.png)
SETUP AGENTS
Agents are setup so operations have visibility over who the work has been allocated to and the system keeps the record of past jobs administrative purposes such as agent payments.
To setup Agents go to Menu>Administration>Vehicles> Agents
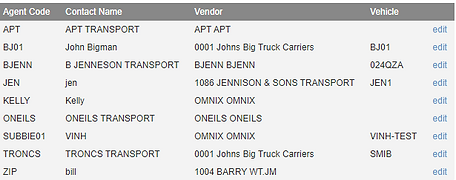
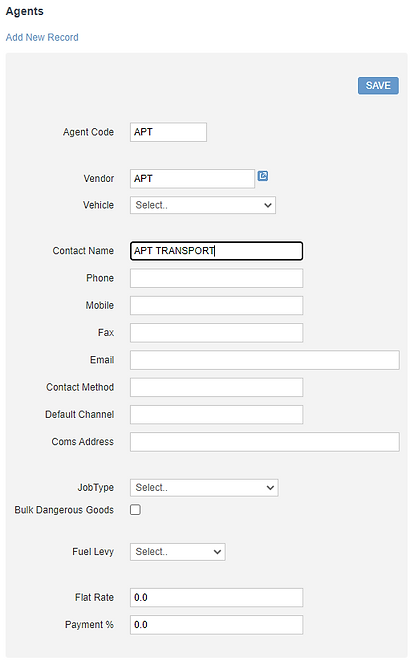
Add or Edit Agents
-
Agent code is an abbreviation for the agent.
-
The vendor is a supplier code that is associated with the Agent. (Setup Vendors)
-
The vehicle is equipment that belongs to the Agents.
-
Contact Name down to Coms Address are general information fields related to the Agent.
-
Job Type can be left blank or set so an agent is restricted to a particular job type.
-
Fuel Levy is used to calculating the fuel levy to be paid to an agent.
SETUP VENDORS
Agents are set up so operations have visibility over who the work has been allocated to and the system keeps the record of past jobs administrative purposes such as agent payments.
To setup Vendors go to Menu>Administration>Vehicles>Vendors
.png)
Add or edit vendors
-
Vendor Code is an abbreviation for the vendor and can be the same code as the agent.
-
Business Name is the supplier/agent's business name.
-
ABN is the Australian Business Number allocated to that business.
-
Contact Name down to Country are general information fields related to the vendor.
-
Tax code and Terms can be used for imports into your Accounting software.
-
Fuel Levy is used to calculating the fuel levy to be paid to a vendor.
.png)
SETUP FULL LOAD CATEGORIES & HALF LOAD CATEGORIES
Full Load Categories and Half Load Categories are setup so manifests can be costed at a full or half load rate no matter how many consignments or items are in the load.
To setup Full Load Categories and Half Load Categories go to Menu>Administration>Vehicles>Full Load Categories or Menu>Administration>Vehicles>Half Load Categories
.png)
Add or edit full load categories & half load categories
-
Code is an abbreviation for the load Categories.
-
Description is what the Category is called.
.png)
SETUP CARRIES
Carriers are setup so a Driver and Vehicle are combined into a single Carrier which can be used for scheduling.
To setup Carriers go to Menu>Administration>Vehicles>Carriers
.png)
Add or edit carriers
-
Doc No is a system-generated number.
-
The description is the name given to the carrier or their business name.
-
Depot is where the carrier is based.
-
The driver is the allocated or agent driver.
-
An alternate Driver can be a backup driver or left blank.
-
The vehicle is allocated or agent vehicle.
-
Start and End Dates can be used to schedule a carrier or set for a contracted period.

SETUP WAREHOUSES
Warehouses are setup so customer inventory can be managed and invoiced out based on movements within the invoice period. To setup Carriers go to Menu>Administration>Warehouses>Warehouses

Add or edit warehouses
-
Warehouse Code is an abbreviation for the warehouse and can be the same code as the depot which is normally associated to the location.
-
Description is the name given to the warehouse.
-
Department is related to the GL department or cost centre.
-
All other fields are address fields.

SETUP REPORTS
Reports is where you can link Jasper reports or web pages to V6 reports.
To setup Reports go to Menu>Administration>Reports

Add or edit reports
-
Customer is so reports are only for a customer to view or leave blank for all customers. If required for internal use enter CLERK.
-
Report Name is the name given to the report.
-
Report URL is the Uniform Resource Locator or address of where the report is located.

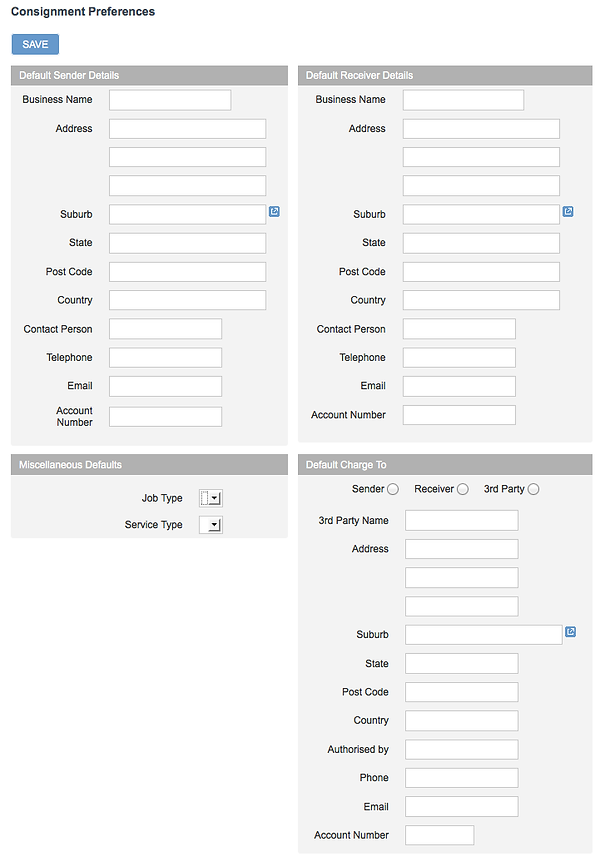
SETUP CONSIGNMENT DEFAULTS
Consignment default values are applied when users are making bookings. This setting is a global setting for all users, but if a user has an individual setting, that setting will overwrite the Consignment Defaults. This saves time by minimising the amount of data to be entered to place a booking. To setup go to Menu>Administration>Consignment Defaults.
SETUP EMAIL RULES
Email Rules are used to send alerts/notifications to customers, receivers or internally when something happens on the consignments so that they can be actioned accordingly. The rules define circumstances e.g. consignment status changes, and to whom the emails should be sent.
To setup email rules go to Menu>Administration>Email Rules.

Add or edit email rules
-
Id is a system-generated field.
-
Enabled when checked rule is active.
-
Rule Name is the name given to the rule.
-
Email From is used so the email receiver knows where the email came from. (This can be left blank but is not recommended)
-
Email To, Email CC and Email BCC are used to control who receives the notification or can be left blank to use the default email address for the customer or user.
-
Email Subject is used to notify the receiver.
-
Email Body is use to send a default message with the notification.
-
Attach Consignment PDF if checked will attach a PDF copy of the consignment note.
-
Attach Labels PDF if checked will attach a PDF copy of the tracking labels.
-
Conditions the rest of the fields are conditions and can be left blank unless required.

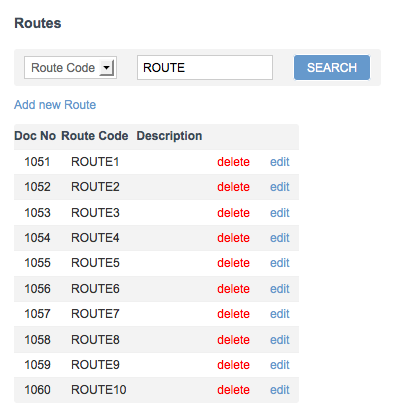
SETUP ROUTES
A route in V6 can be one leg or multiple legs, they are defined as from location and to location. When the manifest auto-generation process is run, this will look at the routes and create the manifests based on the criteria set in each route. The example below would create a manifest for each leg or trip within the route.
To setup routes go to Menu>Customer Service>Routes.
Add or edit routes
-
Doc No is a system generated number.
-
Route Code is an abbreviation for the for the route.
-
Description is the name given to the route in most cases in will be location to location.
-
Date is set to control when the route applies.
-
Town is the Start and finish location of the route.
-
Carrier can be set to allocate to an individual carrier or left blank to manually allocate from the despatch screen.
-
Vehicle can be set to allocate to an individual vehicle or left blank to manually allocate from the despatch screen.
-
Agent can be set to allocate to an individual agent or left blank to manually allocate from the despatch screen.
-
Auto Manifest Allocation is an unused field reserved for future development.
-
Local route is used to indicate this route is local. In the manifest auto-generation process, if multiple routes are marked as local for the same from and to towns, multiple manifest can be generated. If the route is not local, only one manifest will be generated per each from and to location.
-
Default route is an unused field reserved for future development.
-
Auto manifest generation is used so V6 will create a manifest for the specified route and is subject to manifest operations.
-
Day of week this controls what days of the week the route is serviced.
-
Legs control how many manifests are created for this route and where they start and finish.

SETUP CUSTOMER TERMS
Customer terms setup provides a way to define different payment terms for different customers. The customer terms information is used in the invoicing process.
To setup go to Menu>Administration>Customer Terms.

Add or edit customer terms
-
Terms Code is an abbreviation for the for the terms.
-
Description is the name given to the term.
-
Due days is set to control how many days after the invoice date payment is due.
-
Discount days is an unused field reserved for future development.

SETUP WELCOME MESSAGE
The Welcome message appears right after a user logs into V6. This can be used to advertise the business, new services, holiday messages or public holiday hours etc. To setup a welcome message go to Menu>Administration>Welcome Message.
Add or edit welcome message
To add, edit or change the welcome message users can type in a massage or copy and paste of an existing document.
Formatting can be done by using the tool bar at the top of the message area.
Images can also be added by using the tool bar at the top of the message area.

BILLING
Billing to V6 incorporates many difference areas of the AR function and requires careful setup of values are sent to the correct accounts etc.
SETUP G/L ACCOUNTS
To setup G/L Account go to Menu>Customer Service>Billing> G/L accounts.
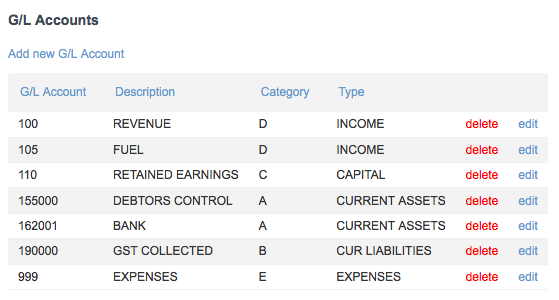
Add or edit G/L accounts
Locations are an important part of V6 and help with the rating and routing processes, location are treed as follows Zone>Area>Town>Postcode>Suburb.

SETUP DEPARTMENTS
To setup GL Departments go to Menu>Customer Service>Billing>Departments.

Add or edit G/L account
-
G/L Department is a 20-character alphanumeric field related to a cost centre these are normally set by a company accountant.
-
Description is the name of the G/L Department

SETUP A/R DEFAULTS
These A/R Defaults will be used when a value has not been supplied during the setup process, and can used as a convenient way to setup various other V6 tables. To setup A/R Defaults go to Menu>Customer Service>Billing> A/R Defaults
Add or edit A/R defaults
-
Tax Code is so GST can be set as a default code.
-
Terms Code is the default terms of trade
-
A/R Account is the default account for revenue.
-
Cash Account is the default account for cash.
-
A/R setup complete this option is used when there is a legacy system, and users need to copy existing data into V6. When users change A/R Setup complete to YES, the initial balance is set.

SETUP TAX CODES
Tax codes are used in V6 to manage GST etc.
To setup Tax codes go to Menu>Customer Service>Billing>Tax Code
Add or edit tax codes
-
Tax Code is code for the tax type.
-
Description is the name of the tax.
-
Rate is the percentage of the sale required for the tax

SETUP DESKTOP PRINT CLIENT
V6 includes a desktop client to support printing directly and automately the labels or consignment notes after consignment notes or tracking labels are created in the system. This setup requires the installation of a client on the desktop connecting to the printer.
1. Download an install java runtime (JRE8)
If the desktop does not have Java runtime (version 8), goto oracle website and install Java runtime 8.0. (https://www.oracle.com/java/technologies/javase-jre8-downloads.html). Follow the instruction on the Oracle website to install the Java Runtime. Please download correct deployment package for the platform (windows or linux, mac...). In many cases, the Java Runtime have already been installed and users do not have to go through this step.
2. Create a folder called "PrintClient"
3. Download the v6-print.jar from
https://downloads.omnix.com.au/download/printing_client/v6-print.jar and store it into the above folder.
4. Omnix provides customer-specific printconfig.properties. Users need to store it in the same
folder above. (this printconfig.properties is pre-made and sent to you by omnix. This is to ease your setup)
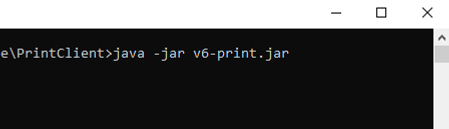
5.Open the terminal and navigate to the folder created at step 3 and type following command
java -jar v6-print.jar
On the Windows Platform, at the first run, Windows may ask users for permission to run. Users need to accept and enable permission for v6-print to access the network.
6. Setup and test physical printers
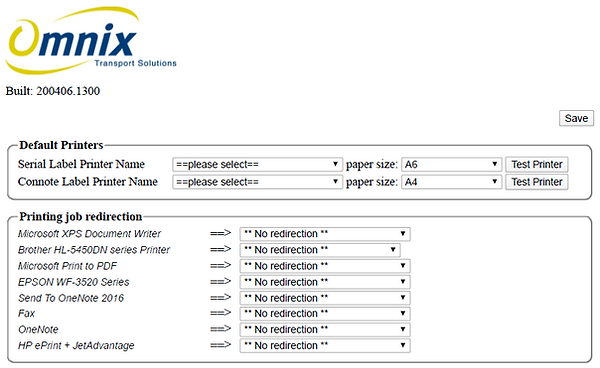
Once the printing client has started, go to http://localhost:9090/configuration to configure physical printers.
Select the printers to be used as serial label and connote label printer and appropriate label size (default A4 for connote label, A6 for serial label). After selecting the desired printers, click the “Test Printer” button, and check if the program can communicate with printers properly (It should print a test label).
This print client should be kept running all times. Whenever a consignment is created (via automated tools) and matches the configured criteria to auto-print, it will be automatically printed.
The "printing job redirection" feature: This client supports print jobs redirection. Jobs sent to a printer on the left can be redirected to the printer on the right. This feature is handy when a printer malfunctions temporarily.
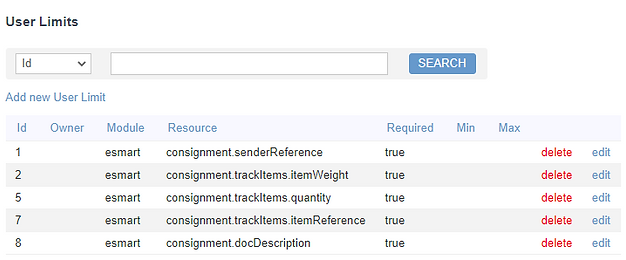
SETUP USER LIMITS
User Limits are used for the validation of the consignment field, either it's required or not, and what will be the maximum and minimum value for the consignment field. This function helps the user to have full control of consignment fields
To set up user limits go to Menu>Administrators>Users>Users>Limits
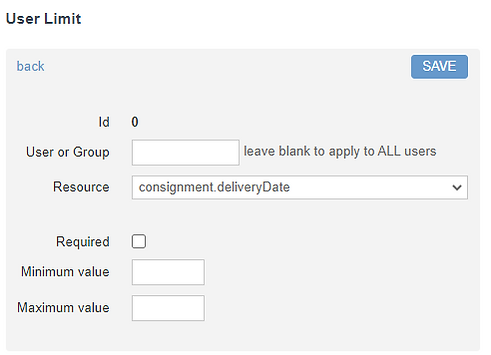
Add or edit User Limits
-
The user group will be empty if the rule is not to apply for all users.
-
A resource in the field of the consignment on where you apply the rules.
-
Required is the checked boxed field which checks the consignment value is required or not while saving
-
The minimum value is the field to define minimum value for the specific field
-
The maximum value is the field to define maximum characters for the specific field
For add edit user limits, click on Add new user limits>
SETUP UNITS
Units Means a recreational; vehicle or towable owned by a person other than the company that is in any's possession for sale on a consignment basis.
To set up user limits go to Menu>Administrators>Types>Units

Add or edit Units
-
The code is the field where the user can enter the relatable code for the defined unit
-
The singular description is the field where the user can define a single value for the unit
-
The plural description is the field where the user can define Plural value for the unit
For add edit units, click on Add new record>

SETUP CONTAINER SIZE
The container is a large metal box of a standard design and size used for the transports of goods by road, rail, sea, or air.Standard ISO shipping containers are 8ft(2.43m) wide,8.5ft(2.59m) high and come in two lengths;20ft(6.06m) and 40ft(12.2m) .Extra tall shipping containers called high-cube containers are available at 9.5ft(2.89m) high.
To set up user limits go to Menu>Administrators>Types>Container Size

Add or edit Container Size
-
Size code is an alphanumerical field where you can define code for the container size.
-
The description is the field where you can define the detail of container size
-
Internal length is a decimal field that you can define the inner length of the container.
-
External length is a decimal field that you can define the outer length of the container.
-
Internal width is a decimal field that you can define the inner width of the container.
-
External width is a decimal field that you can define the outer width of the container.
-
Internal height is a decimal field that you can define the inner height of the container.
-
External height is a decimal field that you can define the outer height of the container.
-
Tara weight is a unladen weight of the container.
-
Max gross weight is the maximum operating weight of container.
-
Cubic capacity refers to the volume of a cylinder between internal volume and external volume.
-
Door opening width is the width of door leaf of vehicle.
-
Door opening height is the height of door leaf of vehicle.
For add edit units, click on Add New Container Size>

SETUP CONTAINER TYPE
These shipping containers are the structures that store various kinds of products that need to be shipped from one part of the world to another using different type of container ships.Various kind of shipping containers are being used today
To set up user limits go to Menu>Administrators>Types>Container Type

Add or edit Container Type
-
Container Type is a alfanumerical field where user can enter name of container type
-
Description is the field which define the detail of container type.
For add edit units, click on Add New Container Type>
